Well hello friends! It's now noon on Tuesday morning and time to choose a winner for the 2 Hello Kitty purses. Here's how it went down: I numbered each comment left and added in an extra entry for those who shared the link, plus I gave an extra entry to Carolyn who commented on the link on FB.
So your numbers were:
1-Tarynia
2- Tarynia
3- Diana
4- Chelsea
5- Kristen
6- Misty
7- Misty
8- Carolyn
Then I headed over to random.org and entered my high and low. 6 was the first number it generated and then it picked 2.
MISTY and TARYNIA You two are the new owners of the purses!!! Hope you enjoy them. :)
Now on to another tutorial.
I went back and forth about whether or not I should do another sewing tutorial or a cooking one or a scrapbooking one or a furniture refinishing one. My deciding factor was a visit to pintrest where I saw this dress:
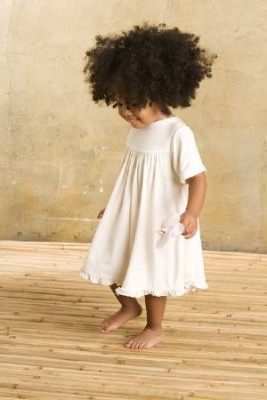
I needed to make it. And I just happened to have a yard of pink knit fabric that I got in the remnant bin for 50% off that I was looking for the perfect pattern for. So you get another sewing tutorial.
First let me tell you, sewing with knit fabric is not for beginners. It is a pain. If you are a beginner sewer, use this tutorial with a cotton fabric. It will still be super cute. Furthermore, you need to use a ball point needle on your machine when sewing with knits, so using a serger is out, unless you have a wierd fedish for threading those beasts. Luckily knit does not frey so you don't need to finish your edges, a simple straight stitch will do just fine to keep it all together. And lastly, when you are done sewing with your knit fabric don't forget to switch your need back to a standard one. If you don't it will poke large holes in other fabrics and make you stitch tension not good.
Secondly, this is complicated sewing in general. You will be making your own pattern and doing a few tricks that took me a while to ge thte hang of. I don't want you to think I am discouraging you to try it, I am just saying don't run a marathon until you have trained for it.
Okay, now on with the step by step.
To get make a pattern you are going to need a shirt that fits the person you are wanting to make this dress for, one that fits loosely. Turn the shirt inside out and fold it in half so the sleeves are to your right. Using newspaper, butcher paper or any other paper large enough trace around the body of the shirt and around the seam where the sleeve joins the body. Like this, adjusting the neck line as you see fit:
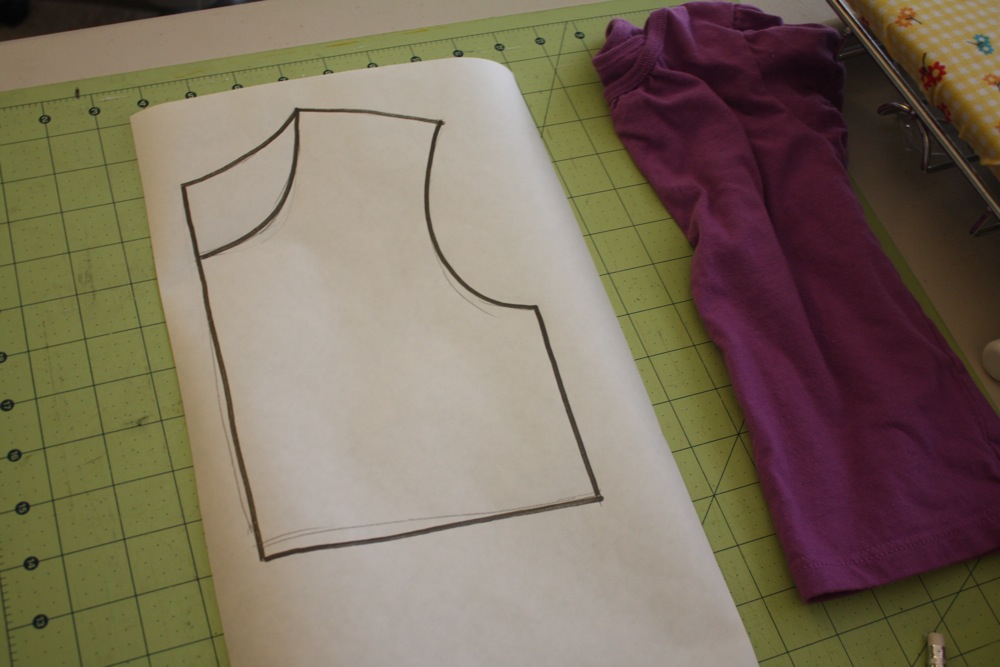
KEEP THIS DRAWING FOR FUTURE REFERENCE FOR OTHER DRESSES YOU MIGHT WANT TO MAKE. It is a very standard bodice pattern and can be easily adjusted for pretty much any dress you make.
Cut this out and mark the line opposite the sleeve as a center fold. Now take the cut out where the sleeve goes and trace it in pencil along the edge of paper leaving a space to finish the rest of the sleeve drawing. You are going to make that first cup shape into more of an S shape, but you need that measurement from your bodice pattern.
Cut this out and mark the line opposite the sleeve as a center fold. Now take the cut out where the sleeve goes and trace it in pencil along the edge of paper leaving a space to finish the rest of the sleeve drawing. You are going to make that first cup shape into more of an S shape, but you need that measurement from your bodice pattern.
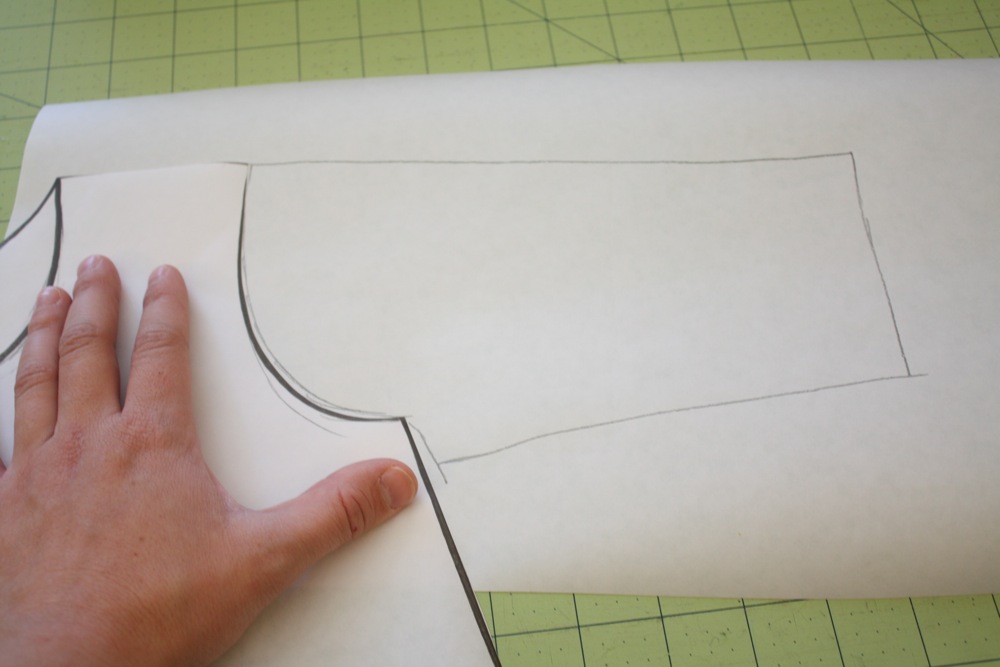
(first trace the arm hole...)
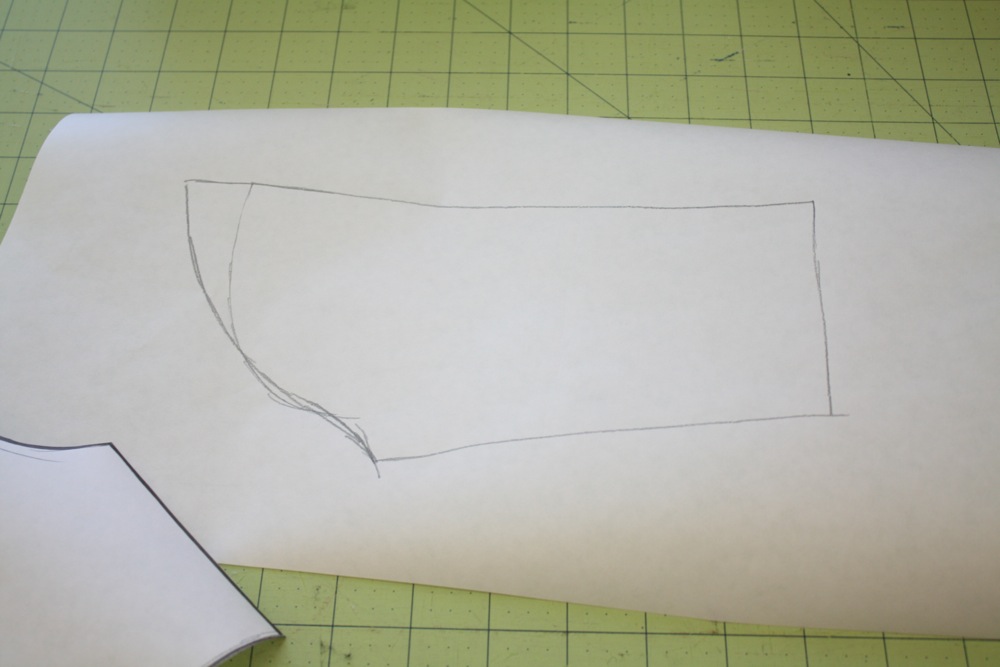
...then soften the edges and make it an S shape.
Measure the arm length of the person you are making the dress for from the top of their shoulder to the bottom of their wrist. your top line will be that distance, then make a staight linedown about 1.5 inches for a toddler, 3 inches for an adult (adjust as you need to) and conect the bottom of the S shape to the bottom of the cuff line. Mark the top, longer line as a fold line. You will be keeping this as a basic sleeve pattern, so if you are ambitious, measure the arm of the person for the pattern where different sleeve lengths reach their arm and mark it on the pattern so you won't have to always measure them.
Now that you have your basic patterns for a bodice and a sleeve, you are going to adjust them for this specific dress.
This has a very high waist band- even higher than an empire waist; it is cut at the bottom of the sleeve. So we are going to take our basic bodice pattern and place the fold line on a fold of our fabric and fold the paper patten up to the bottom of the sleeve. Pin it and cut 2 of these. Then take you sleeve pattern and place the fold line on a fold of fabric and cut 2 of these.
NOTE: If your fabric has a right and a wrong side you will need to cut out 1 sleeve and one bodice with the top of the pattern (the side that you wrote on) facing up and one set with the top of the pattern facing down. Knit fabric doesn't have a right or wrong side, so it saves a little time. Then cut 2 skirt pieces that go from bias edge to bias edge of your fabric and as long as you want the dress to be measuring from under the arm to the deisred length. Kenaley, for instance had a 19 inch length. You will also need 2 pockets 4 inches by 6 inches with a cupped bottom and 2 pieces for the bow detail on the pocket that are 1 inch by 3 inches, finally you will need strips of fabric that are 2" wide by the width of your fabric- 3 of them, that we will be using for bias tape and the bottom ruffle.
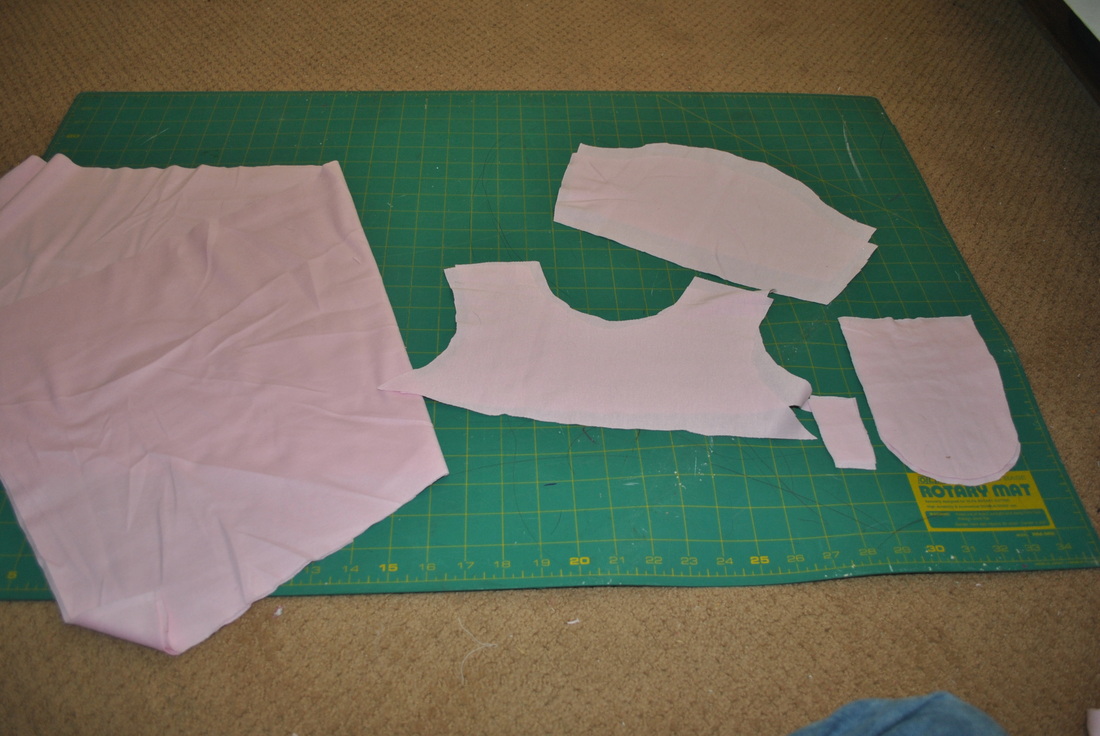
(this picture does not include the 2" strips)
On with sewing!
You are first going to take the 2 bodice pieces and sew the shoulder straps together. like this:
On with sewing!
You are first going to take the 2 bodice pieces and sew the shoulder straps together. like this:
At this point I cheated. Usually you will finish the neck line off with bais tape, by ironing your 2 inch strips 1/2 inch in on each side and then ironing that in half, pinning and sewing it to the neck line. You WILL unpick and you WILL hate it. I hate bias tape and have come up with this little cheat that only works with knit fabric. Iron your neck line on the right side of the fabric down 1/4 inch- it doesn't need to be exact, just eyeball it and make it even the whole way around. Then take that over to the sewing machine, line it up under your presser foot and fold it down one more time, don't attempt to double iron this seam because it is too smal and you will just get fed up with it and give up. Put your presser foot down and lower your needle by hand into the fabric to hold it in place while you fold over the next little bit that is feeding into the machine. STITCH SLOWLY and right on the edge of the double fold.
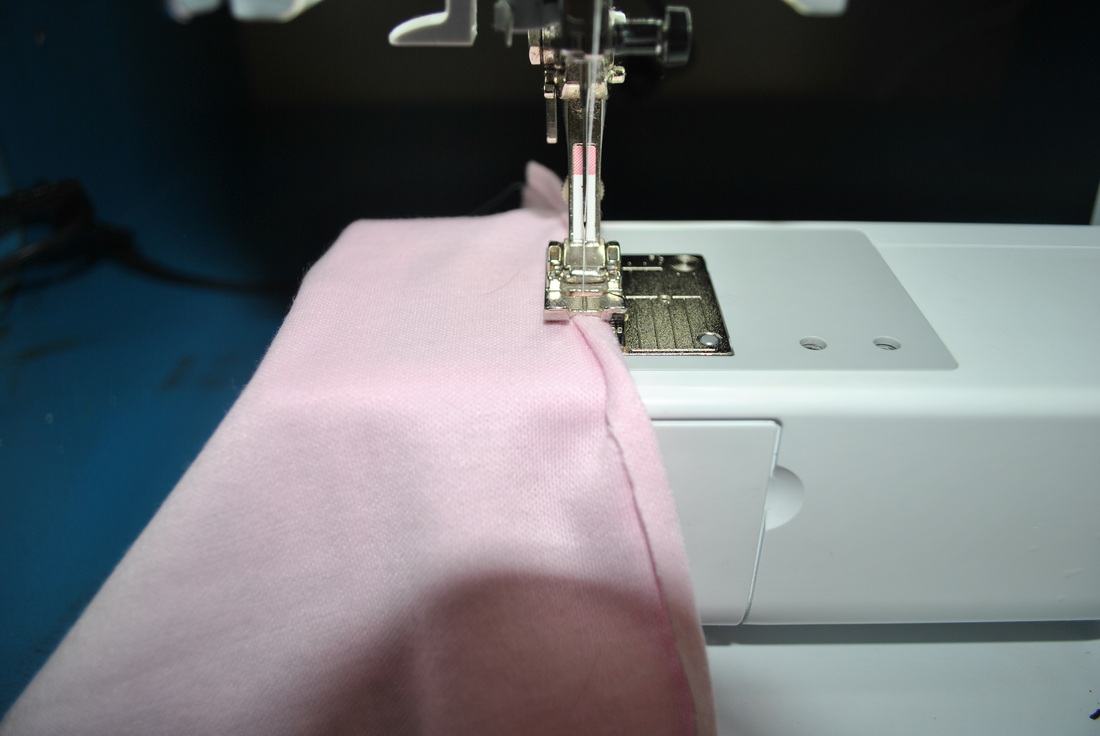
You are going to have a little bit of a bump at each shoulder seam, open the seam up and then when you are done stitching, clip it off. Do this same thing with the bottom cuff of your sleeve.
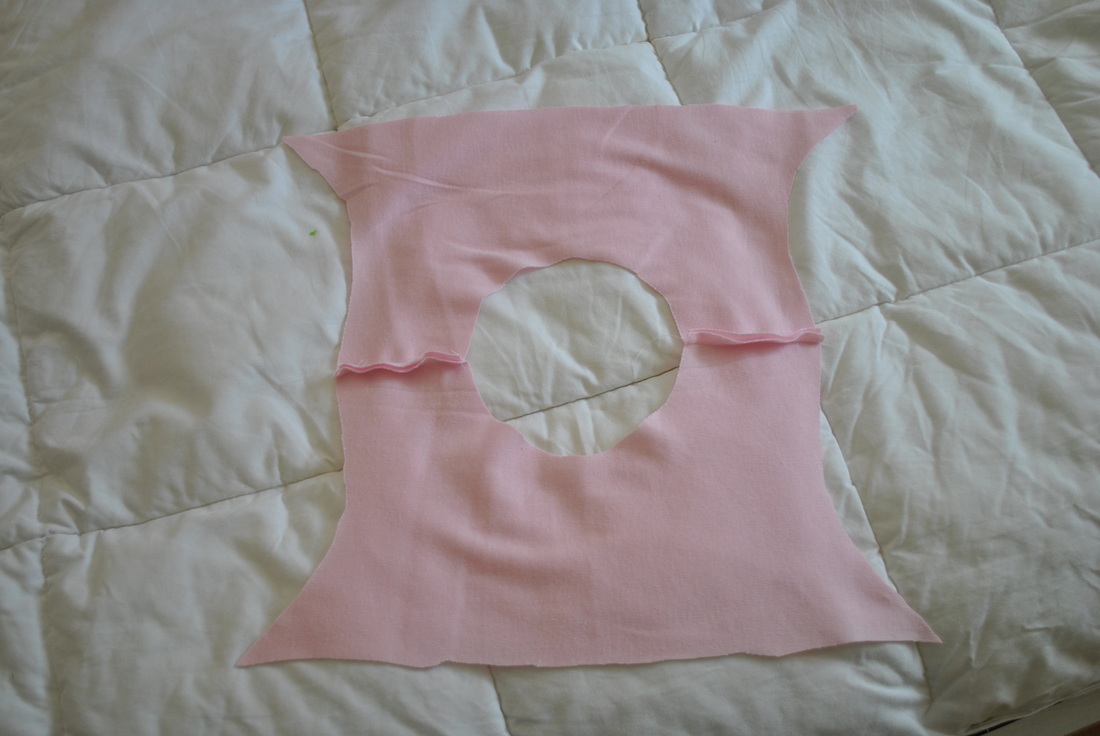
Then you are going to attach the sleeve to the bodice. You do this by pinning the S shape into the sleeve opening on the bodice.
Then you are going to attach the sleeve to the bodice. You do this by pinning the S shape into the sleeve opening on the bodice.
Like this. Then just line up the two edges of the fabric and straight stitch the edge on bothe sleeves. You should now have what somewhat resembles a very short shirt with sleeves when you fold it in half.
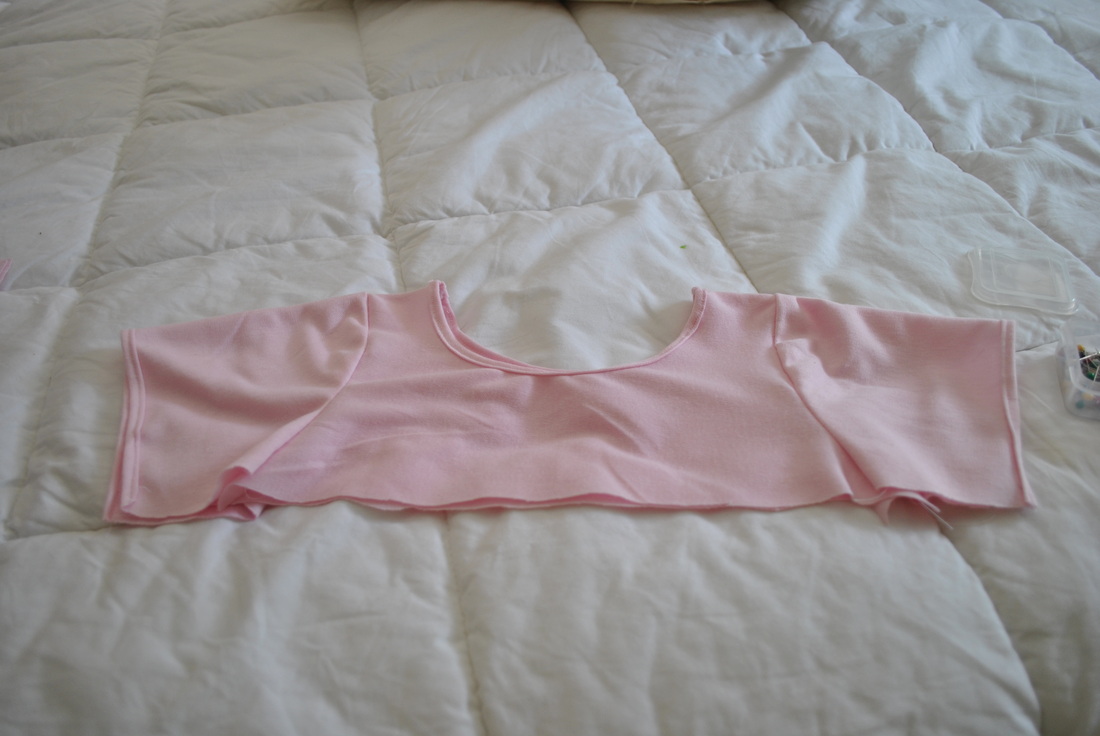
SEE!!
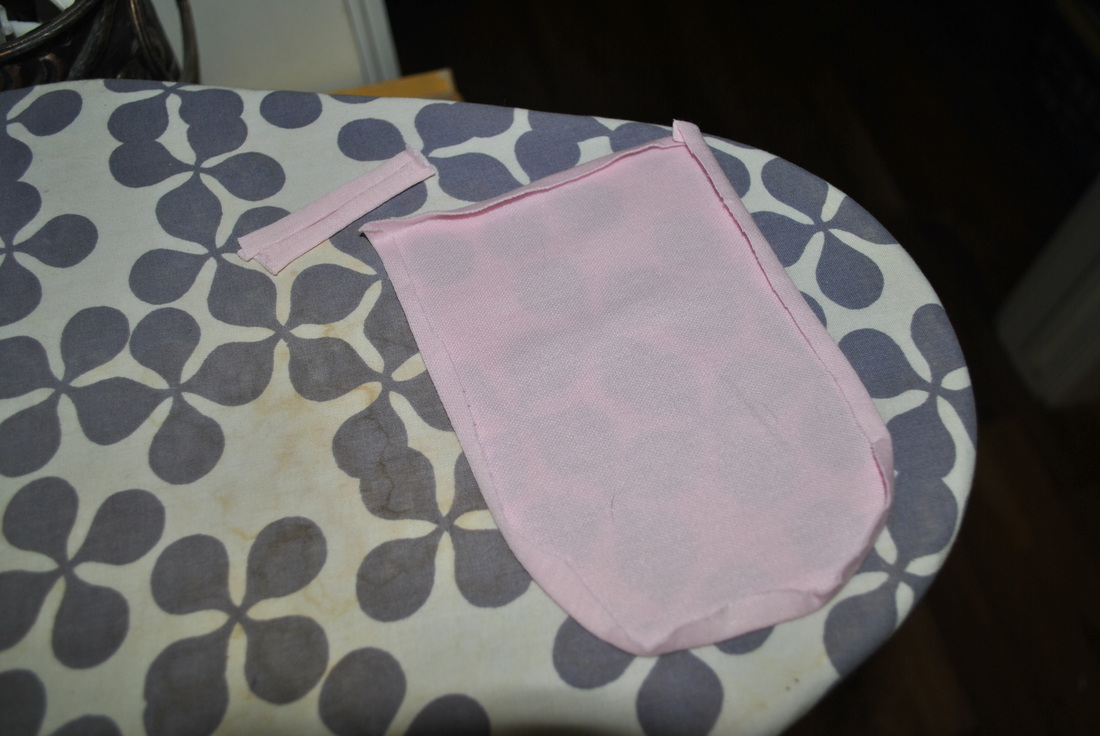
Okay, now we are going to work on the 2 pockets for the skirt. First you need to iron a 1/4" seam all the way around the pocket. You will more than likely want to use startch when you do this, because its a small seam on a small piece of fabric. Once you have it ironed, stitch just across the top of the pocket (the flat side) then you are goign to take the the little tab that we cut out and iron 1/4 inch on each long side then make the two ends meet in the middle and iron it again, you can see it pictured just above the pocket.
Okay, now we are going to work on the 2 pockets for the skirt. First you need to iron a 1/4" seam all the way around the pocket. You will more than likely want to use startch when you do this, because its a small seam on a small piece of fabric. Once you have it ironed, stitch just across the top of the pocket (the flat side) then you are goign to take the the little tab that we cut out and iron 1/4 inch on each long side then make the two ends meet in the middle and iron it again, you can see it pictured just above the pocket.
Once you've got both pieces ironed and the top stitched on the pocket we are goign to make the cute bow detail for the top. Take your tab and pin it 2 inches down from the top in the center of the back.
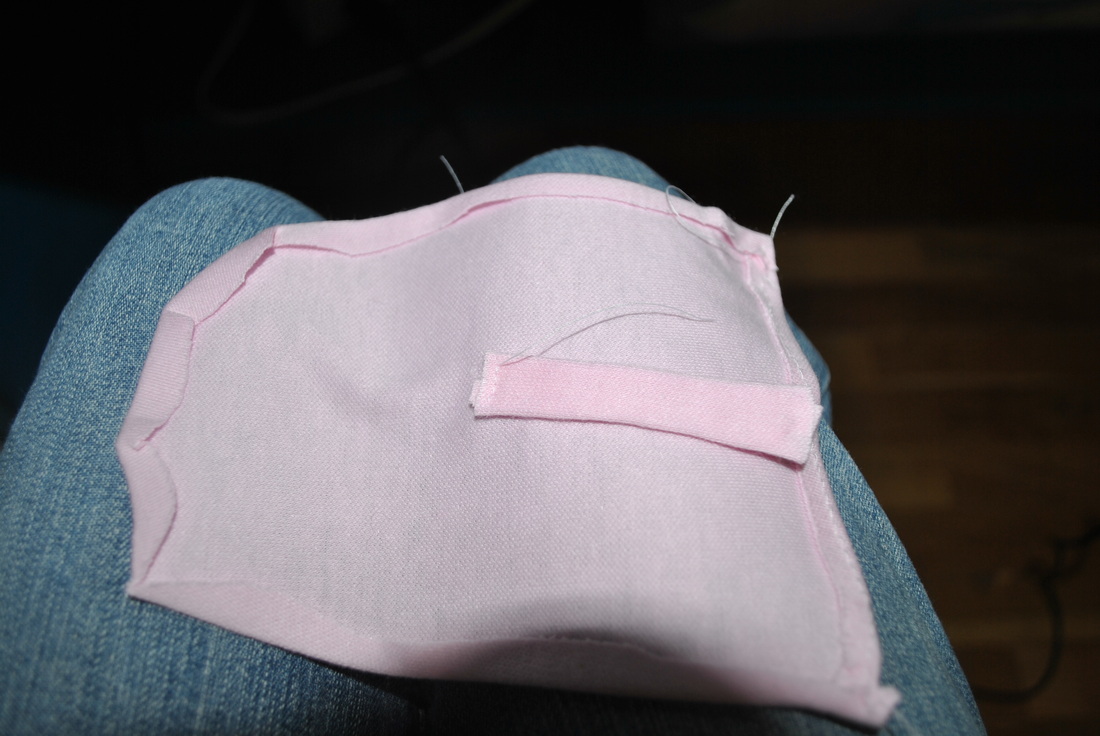
Stitch it going once forward and once backwards then forwards again. Flip the pocket over and fold the excess length of the tab so you have about 1/2 inch remaining. Pull it down so it just goes over the first stitch you made, esentially covering it up and stitch it the same way you did on the back side. It will look like this:

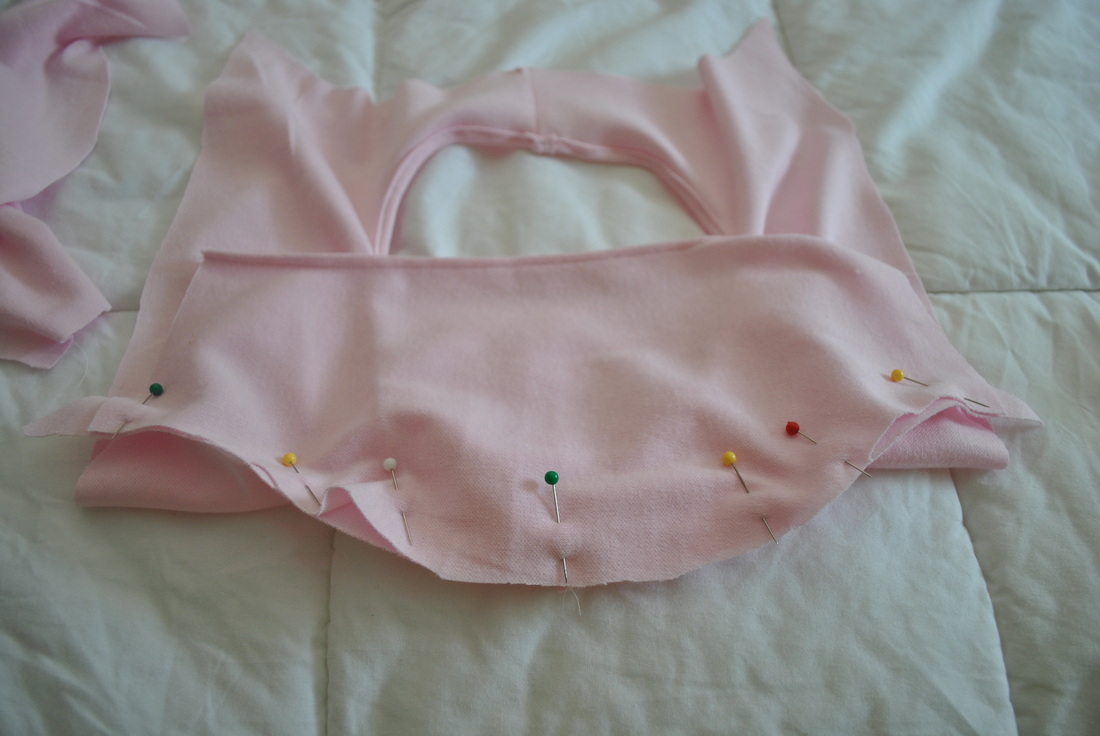
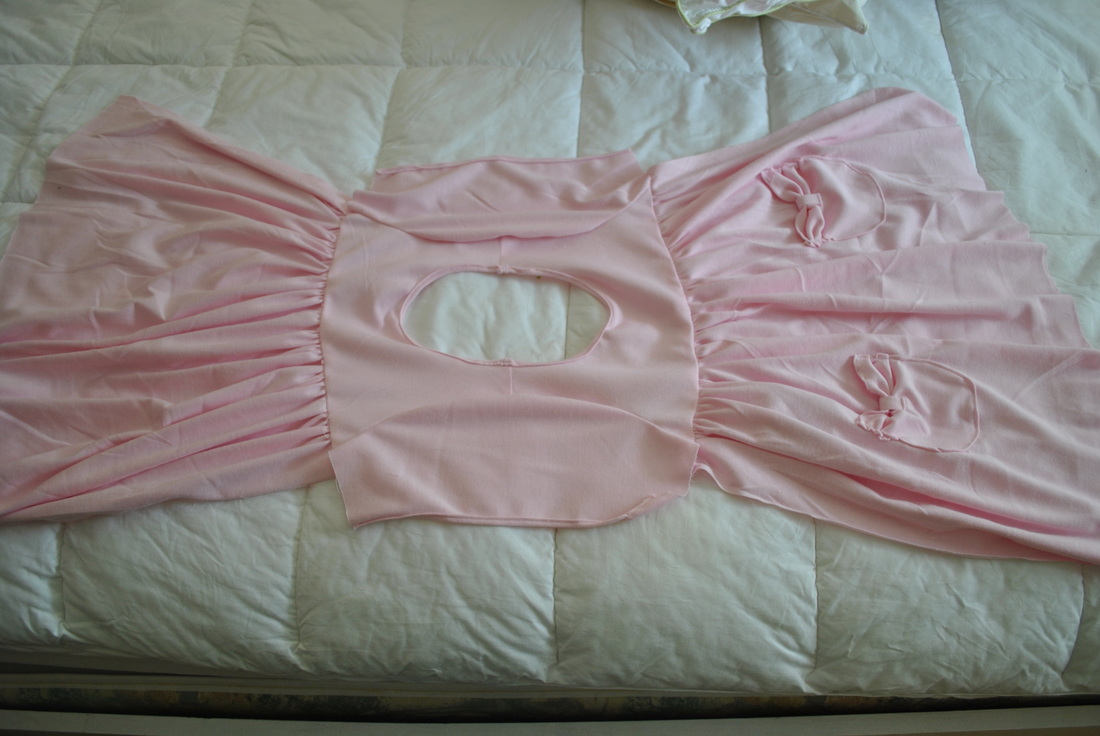
Now we are going to attach it to the skirt. Fold one of your skirt pieces into quarters, put a pin in the corner of the folds and unfold itf. Fold it the opposite way and put another pin in that corner. You should have 2 pins in about the same distance in and same distance down. Place the pocket in this general area, but adjust it as you want to. Pin the bottom and sides then make the top edge as staight as you want it to be and pin that down. Stitch right on the edge of the pocket around the sides and bottom, reversing at the top of each side for strength. (I got a little excited at this point and forgot to take a picture of this step... sorry)
Next we need to gather our top edge of both skirt pieces. We do this by doing the longest straight stitch on our machine then pulling the top thread on each side and evening out the ruffle. As soon as you are done sttiching in that long stitch, switch your stitch length back to a 2.5-3 or you will forget and have to double stitch the next step. Like I did. Pin the skirt to the bodice bottom and stitch along the gathered stitch so it doesn't show through to the front.
Next we need to gather our top edge of both skirt pieces. We do this by doing the longest straight stitch on our machine then pulling the top thread on each side and evening out the ruffle. As soon as you are done sttiching in that long stitch, switch your stitch length back to a 2.5-3 or you will forget and have to double stitch the next step. Like I did. Pin the skirt to the bodice bottom and stitch along the gathered stitch so it doesn't show through to the front.
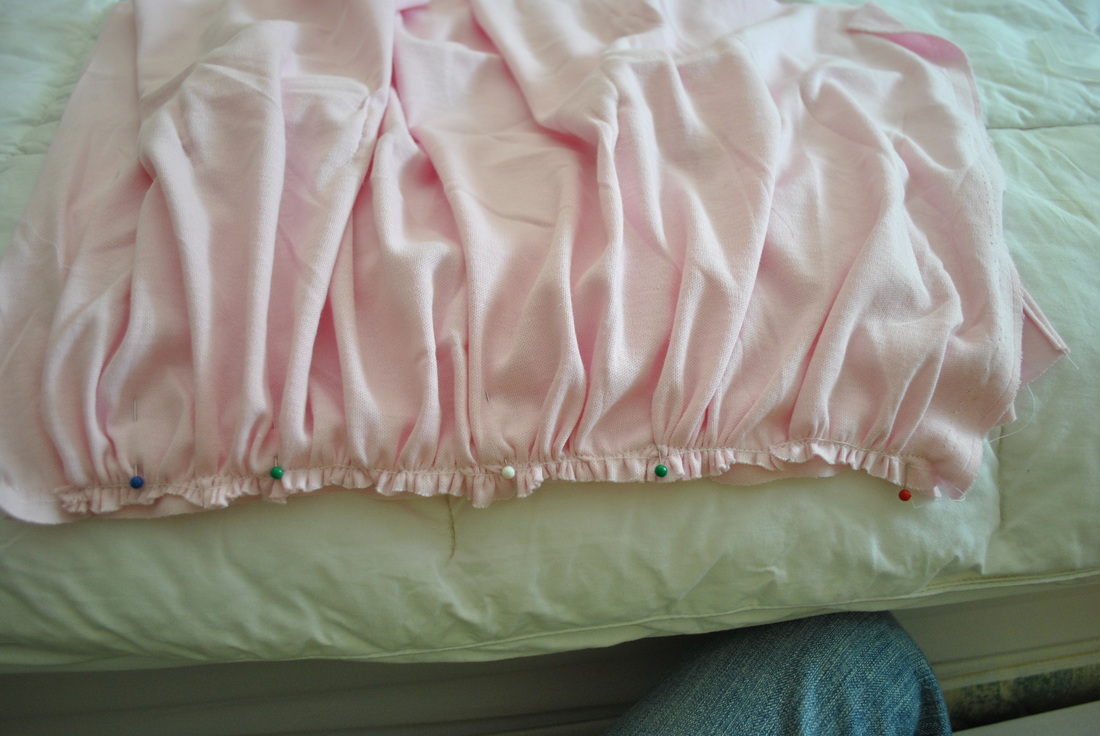
It should look something like this now...
Now we are going to put our right sides together and stitch from the cuff of the arm all the way down to the bottom of the skirt along the edge. Make sure to match the two ends of the cuff up really well, the other seams should match pretty close too, but this will be the one that looks the worst if it doesn't match.
Now we are going to add the ruffle at the bottom of the skirt. Take the 2" strips that you cut and sew them together so you have one long strip of fabric. Iron this in half with the right side out. Then you do do a ruffle in the same way that we did for the skirt. You may want to make a few stitch breaks in the center of the fabric to make gathering easier. Once you have a good even ruffle pin this to the bottom of the skirt with the two edges together. Like this:
Now we are going to add the ruffle at the bottom of the skirt. Take the 2" strips that you cut and sew them together so you have one long strip of fabric. Iron this in half with the right side out. Then you do do a ruffle in the same way that we did for the skirt. You may want to make a few stitch breaks in the center of the fabric to make gathering easier. Once you have a good even ruffle pin this to the bottom of the skirt with the two edges together. Like this:
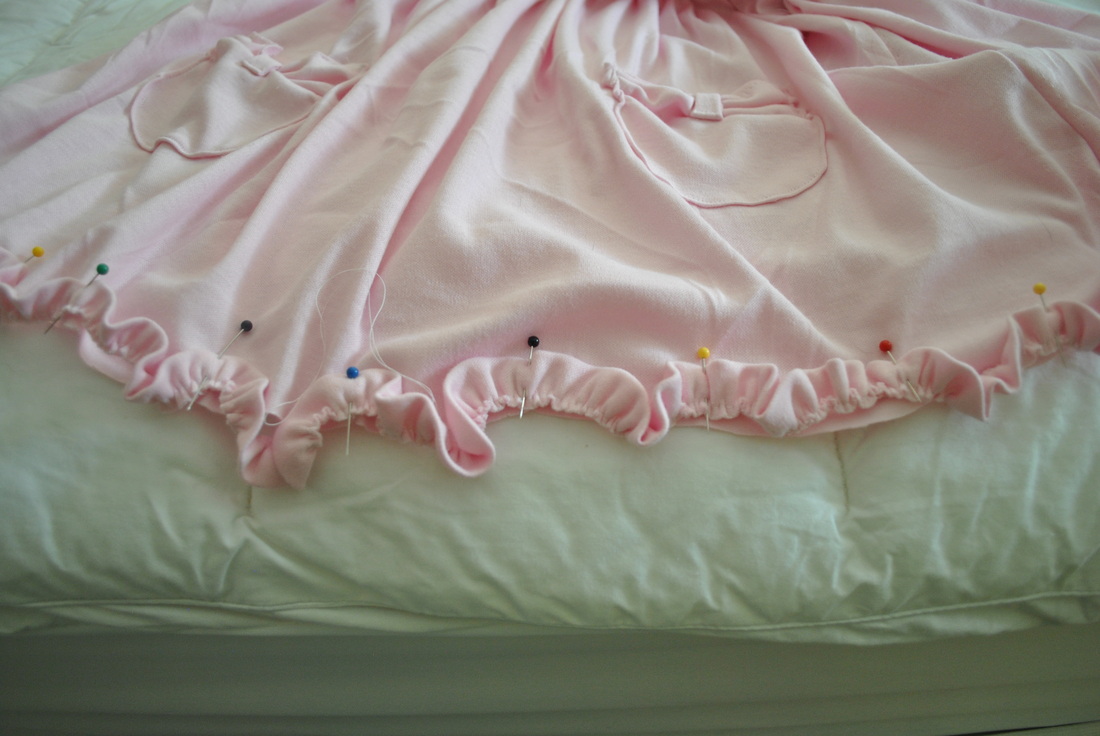
Now you are going to stitch the ruffle to the skirt following the rathered stitch so it doesn't show through. Iron your seam up towards the top of the dress and then do a top stitch 1/8 inch from the seam. It looks better with a top stitch and will help the dress from rolling up. Now we are going to stitch the other side of the dress up starting from the cuff of the arm.
You just finished your dress!!!!!
It should somewhat resemble this:
You just finished your dress!!!!!
It should somewhat resemble this:
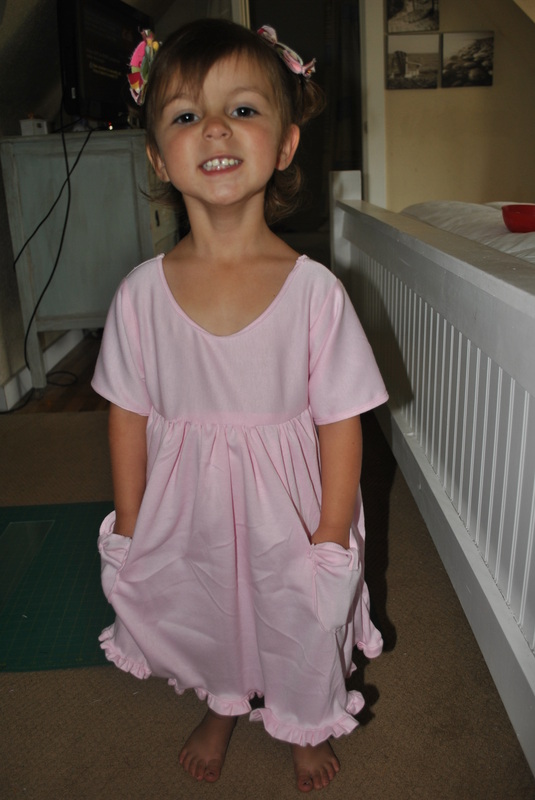
SO CUTE!!!!!
I know you can't wait to start one yourself...but if you are intimidaited by the whole process and just don't think you can do it; call me! I would love to come and help you. Or you can buy the fabric you want and drop it off to me and I will make one for you for only $15!! It's a screaming deal!!
Happy Sewing !!
 RSS Feed