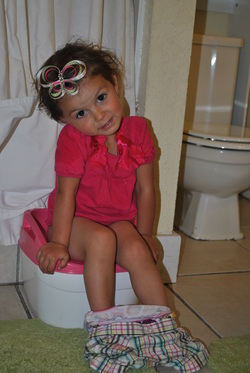
In honor of this sweet little face not having an accident for going on 48 hours now, including a trip to Walmart where she actually told me she needed to go and ACTUALLY did need to go and actually went on a toilet!! Which she had not done yet because she thinks toilets are scary and she will surely fall in. We are using the dreaded potty chair. Something I swore I would never do, but my petite little girl is all of 26 pounds soaking wet, my strapping lads were 31 and 34 pounds when they potty trained and could handle the toilet; she can not. And frankly, I am doing whatever it takes to be rid of diapers.)
Nuff rambling on.
In honor of Princess relieving me of my stalker duties, I have time to blog a little bit. And I have decided to share a little project that I made over the weekend. In the late night hours when everyone was sleeping and I can breathe, and my creative juices allow them selves a little more than making octopus-hot-dog-lunches.
Saturday night it dawned on me that I had to face 3 hours of church with a child on the edge of potty training and taking a potty chair, while very tempting, just didn't fly with the over all feeling that church was going for. I had purchased a foldable seat that fits onto a regular toilet and was planning on bringing that. But then I thought: I will have to bring the entire church bag with me each time we attempt to go during church or walk out toting my very obvious toilet set. Again, not so much the feeling church is going for. So I thought I would make a little tote to fit it in. Something that is very similar to a diaper tote. The time that this thought entered my waking creative brain was pushing 10 pm. Kids were sleeping, stores were closing, so I needed to use stuff that I had on hand.
I rumaged through my fabric stash and found my old, ripped jeans that someday will become a quilt, and thought- why not?? So the wheels started turning and usually when they start turning the hands start cutting too- be it paper, ribbon, food, or fabric. Wheels trun... hands cut.
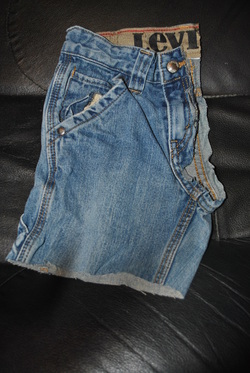
And this is what they cut this time.
A size 6 pair of levis. The right leg, including the zipper. About 12 inches down the leg. Make sure that you aren't cutting the bottom of the pockets, becuase then extra little storage pockets would also be lost.
Before cutting the jeans, make sure that whatever you want to fit in there will infact fit. My size 6 (kids size) semed to fit what I wanted in there, but after getting it sewed together, it was snug. I was really glad that I had the zipper to give me a little extra room to jam my goods in there.

After you get it cut, flip in inside out and sew the bottom hem with a zig-zag stitch to give it a little extra strength. I went over mine twice just to be sure it was strong. Oh, and when you are sewing jeans, remember that the hems are very thick and your machine will likely stall, or needles will break. I find that when I am sewing the hem section, turning the wheel by hand very slowly while wiggling the fabric a little gets the job done. But more likely than not, you will break a needle on the hem.
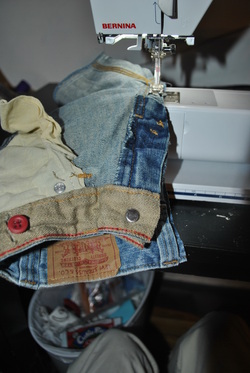
Then you are going to sew up your zipper area. This is where my needle broke. And poked me in the eye.
I took a break and ate some ice cream at this point to recover from the eye trauma.
It was Blue Bunny Chocolate with Salted Caramel. You can go and get some if you want. I will wait. :)
Upon returning I found that what worked better was to unzip the zipper and sew just the outside sems together. It also makes it possible that you can unzip the tote when its complete and allow for a larger opening at the top. Zig-zag it again. You will need to continue sewing down the inside seam on the jeans until you have the whole side together to make the tote side. I followed my seam , but then when I flipped it righside out, it was a funny shape on that side; so then I flipped it inside out again and sewed a straight line down crossing over the seam so my tote would me staight. Save your self the time and just sew a staight lne down the side.
Then, with the inside of the zipper, there will be a little section that has unsewn denim at the waist band. I just zig-zagged that too so I wouldn't have a freying problem.
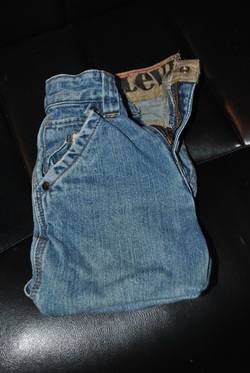
Once your done sewing flip it rightside out and you will have something that looks like this.
Its fully functional and could be left just like this, if that is all the energy, creativity, time or patience that you have. You could stick whatever you made it for in there and be good to go.
But you know me. I cannot leave well enough alone.
So I started decking it out.
Its fully functional and could be left just like this, if that is all the energy, creativity, time or patience that you have. You could stick whatever you made it for in there and be good to go.
But you know me. I cannot leave well enough alone.
So I started decking it out.
I wanted a strap, just a short one. So I ripped 2 strips of this left over coral fabric that I had, each strip about 2 inches wide, laced it through the belt loops, centered my excess at the zipper and then stuck a little hot glue on the back sides of the belt loops so it wouldn't bunch up then tied a knot at the end of the pieces where it met at the button so I had the excess where I wanted to open the button and zipper. My 2 strips were just shy of remnant ege to remnant edge of my fabric. So probably about 35 inched long. It leaves me a stap about 8 inches long
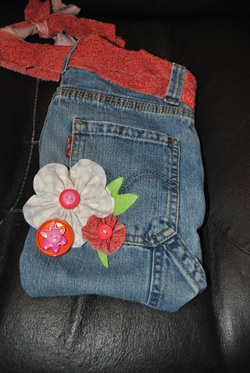
Then I wanted to bling the back pocket.
To make the big white flower, I cut 5 circles. The size of your cirlce will be the size of your finished flower, so if you want a large flower- cut a large circle. One at a time, fold the circles in half, I like to overlap mine just a little bit- about 1/2 an inch so you get the look of a layered flower, with the printed side of the fabric out, and hand sew a straight stitch- baste size- on the folded seam. String each circle on the same piece of thread without cutting or knotting the thread. Once each circle is on the thread, pull the tread tight and make a stitch to join the two end cirlces together. I don't have much luck knotting the thread to finish it off, because the thread usually loosens a little bit and doesn't give me the look I'm after. So I just put a dot of hot glue on the back side and with the thread as tight as I want it, I bury the thread in the glue, wait a bit for the glue to cool, holding the thread tight the whole time. When you can let go of the thread and it stays put, you can clip the excess thread. Finish the flower off with a button, or bling, or whatever you want. I layered 2 buttons together on mine, threaded embroidery thread through the eyes of the button to give it a finished look then glued the buttons to the flower.
To make the smaller coral flower I ripped a piece of fabric about 6 inches long and 1 inch wide then just basted along one side, tightened my thread, joined my two ends together with a stitch and glued my thread down. Then finished the center with a button, you can use what ever you want to.
The other bling on the pocket is a large button with a smaller flower button nested inside it.
I hot glued all the pretties onto the edge of the back pocket, made a few felt leaves and glued those where I liked them. Then I flipped the tote over.
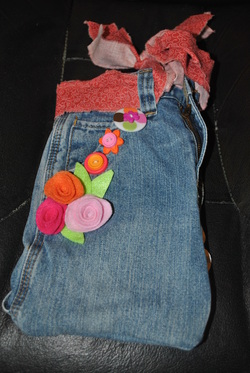
The three rose looking felt flowers are made by cutting a circle out of felt (you can use fabris too) then you cut a spiral into the felt leaving about a dime size circle in the middle. If you want a big flower, you will need to cut a large circle, and leave a larger circle in the center too. I cut these cirlces about the size of the base of a baby bottle and my finished flower is a little larger than a silver dollar. I have made circles about the size of a cereal bowl and come up with finished flowers about as wide as a drinking glass. Your finished flower is usually about 1/3 smaller than your original circle. The width of your spiral will be the hieght of your flower. Starting with the outside of the spiral roll it up, kind of loose, but not loose enough that its unwinding as you roll it. Once it wound up, cover the entire center circle with hot glue and press the wound up spiral into the glue, work quick and spread it out a little to your liking before the glue dries. Give it a little tug and make sure that you got glue on the whole base so you rose doesn't come apart.
I grouped my flowers together, added some felt leaves and hot glued it to the pocket corner. Then I just used layered button again to line the edge of the pocket.
I liked the way mine looked at this point and called it quits.
Plus it was 1 in the morning and I had an 8 am meeting to get to.
I grouped my flowers together, added some felt leaves and hot glued it to the pocket corner. Then I just used layered button again to line the edge of the pocket.
I liked the way mine looked at this point and called it quits.
Plus it was 1 in the morning and I had an 8 am meeting to get to.
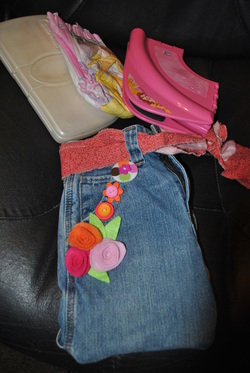
My tote is big enough tha it fits a foldable toddler toilet seat and a Huggies travel wipe box, I can fit an emergency pull up in the back pocket, and a travel size hand sanitizer in the front pocket. I have to unbutton and unzip the top to get the toilet seat out, just because its a little bit too wide, but if you are using this for a diaper tote, you could easily fit a few diapers and a wipe box in there.
If I were to do it again, I would use a larger size of pants. I think for my purpose I would go for a size 10 in kids. The boys just haven't grown out of or trashed a pair of them yet, so 6 is what I had to use.
Thats all for me tonight.
I know I still owe you a recipe for reesses peanut butter cup cake balls. I didn't forget. But my adorable 2 year old is getting sleepy and this is when I get my snuggle time with her. The recipe will have to be another day.
So the


 RSS Feed