I have this grandma- who is arguably the BEST grandma in the world- and every time that I go visit her she insists that I do not leave her house without taking something home with me. She has taught this to me and nearly every person who comes to my house leaves with something in their hand. This time went I went to visit her she gave me jars. Some of them were Mason jars that I gave to her full of jam, and some of them were store brought jars that once held food of some kind. The mason jars I refill with jam and usually return to her; its an on going cycle that the two of us have. The other jars I thought about throwing away, because really what can you do with a used jar? Then I remembered that long ago in my grandpa's wood shop, he used to take jars and use them for storage. I am always looking for storage that will free up a little space on my desk, so I thought... why not? And if I am going to make a simple project- I will share with you a step by step how to.
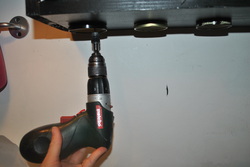
First thing: Take your lids and screw them to the bottom of your cabinets. You will need to put 2 screws in each lid. If you only put one, the lids will turn and it will make screwing them onto the jar much more difficult. Make sure that your screw is short enough that you won't poke through the cabinet, because then you are going to leave a project for your husband to fix. No one likes that.
It really helps to drill a tiny hole through the lid before hand too, metal is not the easiest thing to put a screw through.
It really helps to drill a tiny hole through the lid before hand too, metal is not the easiest thing to put a screw through.
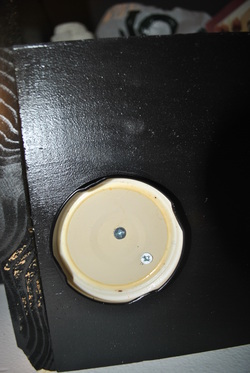
Here is what your lid will look like with the 2 screws in it.
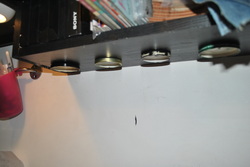
And here is what all the lids look like after you get a bunch put on. You really don't see the lids as much as you can in this picture, I just wanted to show you a good shot. Are you geting the idea of the storage yet? The jar screw onto the lid that is now screwed onto the bottom of the cabinet, so the jar seems to float, as my kids said.
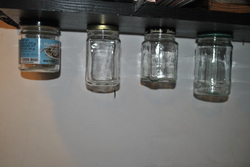
Now, you could stop right here. It looks functional and serves the purpose of freeing up desk space...
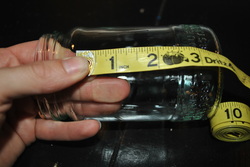
OR...you could get creative and add some cute paper or fabric to the jars to make every one turn their head when they see them. If you want to make it all cute-sie then you will need to measure the length of the face of the jar- the place where a label would go- and you will need to measure around the jar. Lets say that the surface you want to cover is 3 inches tall and 9 inches around. You will need to add about 1/2 inch to the distance around the jar so you have a good piece to make a seam. So the paper that you will cut will be 3 inches by 9 1/2 inches.
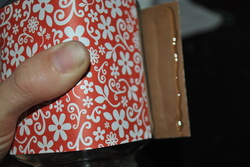
Hot glue works like a charm to adhere the paper to the jar, but make sure that you put the glue on the paper and not the jar. If you put it on the jar it will cool too quickly and you will have a lump there. Plus it peels off pretty easy. Put the paper on as straight as you can, because neither the jar nor the paper has any give and you can't really hide the crooked look.
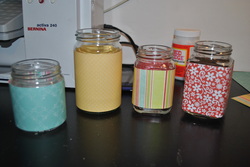
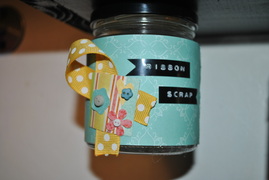
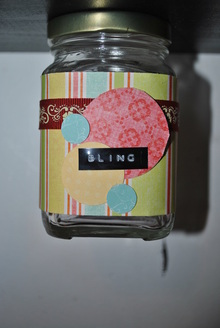
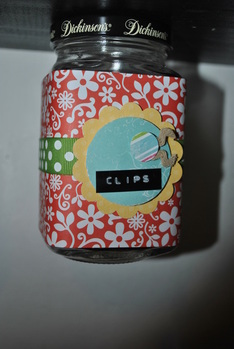
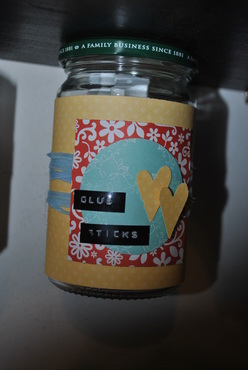
Now, you could stop right here if you felt like this was good enough for you. I wanted to go one step further and put some labels on my jars. So I got out some ribbon and paper punches (I know- retro!) and I dolled my jars up real good!
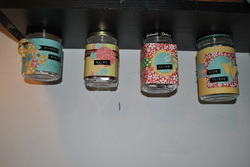
And this is how they turned out!! I am so happy with them. Cute, functional storage, freed up desk space, up-cycled grandma's pass alongs all in under 1 hour.
If you are so impressed with my upcycle project, you should go try it. And show me a picture of how yours turned out.
Happy crafting!!
Happy crafting!!
 RSS Feed